By Reza Shahrokhian
Self Hosted
frigate
docker
cloudflare
mqtt
mosquitto
home-lab
Self-Hosted Frigate with App Notifications and Remote Access via Cloudflare
Self-host Frigate with ViewU notifications, Mosquitto MQTT, and secure remote access through Cloudflare Tunnel and Access. No router port forwarding required.
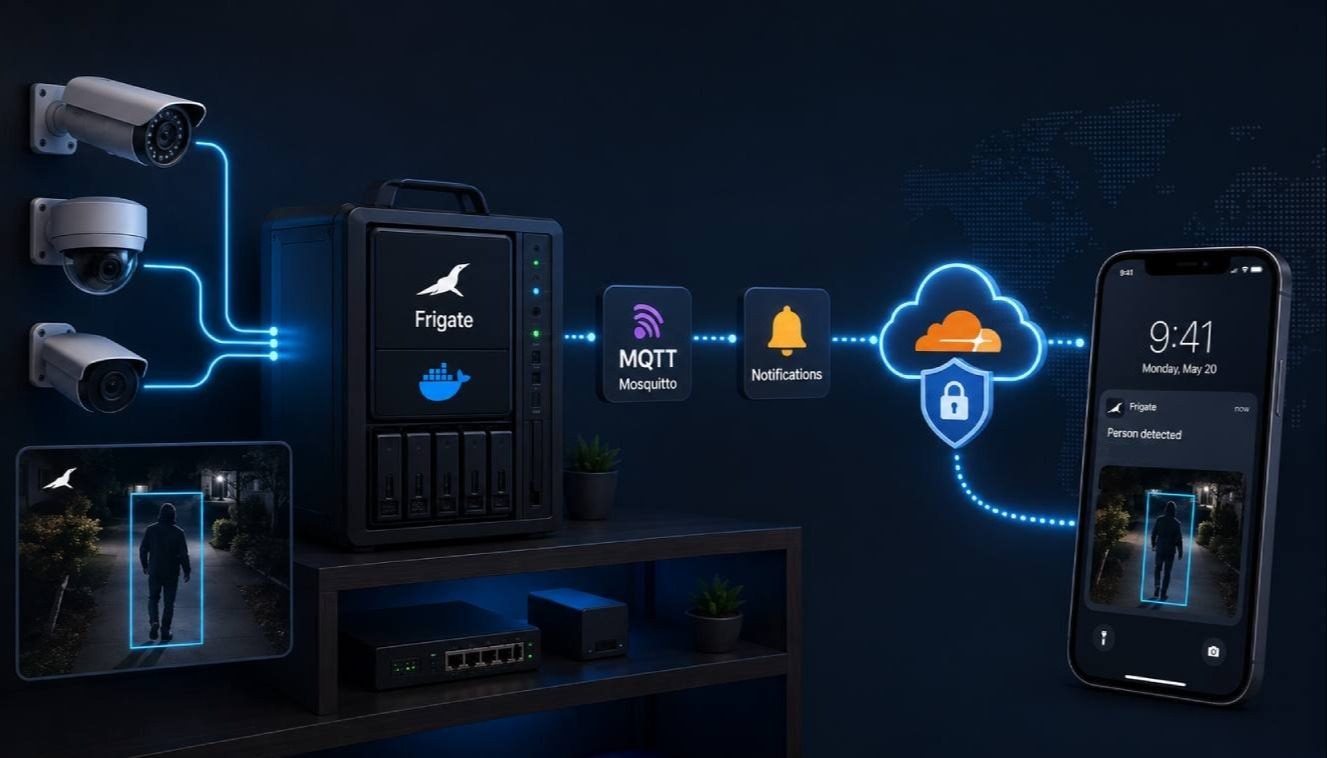
This setup runs Frigate, ViewU, Mosquitto, and Cloudflare Tunnel with Docker Compose.
The goal is simple: keep Frigate and camera recordings self-hosted, get mobile notifications through ViewU, and securely access live cameras, events, and recordings while away from home.
Nothing needs to be port-forwarded through the router. MQTT and MQTT over WebSockets stay inside the Docker network, while Cloudflare Tunnel handles remote access to Frigate.
1. Create the directories
Keep persistent Frigate and Mosquitto data under /srv:
sudo mkdir -p /srv/frigate/config
sudo mkdir -p /srv/frigate/media
sudo mkdir -p /srv/mosquitto/{config,data,log}

sudo chown -R $USER:$USER /srv/frigate /srv/mosquitto
Then create a directory for the Docker Compose stack:
mkdir -p ~/frigate-stack
cd ~/frigate-stack
The final layout will look roughly like this:
/srv/
├── frigate/
│   ├── config/
│   └── media/
└── mosquitto/
    ├── config/
    │   ├── mosquitto.conf
    │   └── passwd
    ├── data/
    └── log/

~/frigate-stack/
├── compose.yml
└── .env
2. Configure Mosquitto
Create the Mosquitto configuration:
nano /srv/mosquitto/config/mosquitto.conf
Add:
persistence true
persistence_location /mosquitto/data/

log_dest stdout

listener 1883
protocol mqtt

listener 9001
protocol websockets

allow_anonymous false
password_file /mosquitto/config/passwd
We are keeping both listeners.
Port 1883 is standard MQTT and is used for normal MQTT traffic between Frigate, Mosquitto, and ViewU.
Port 9001 provides MQTT over WebSockets, which is also required for this setup.
Neither listener needs to be published directly to the internet. Containers on the same Docker network can reach them as:
mosquitto:1883
mosquitto:9001
This keeps the MQTT side of the stack private while still making both protocols available to the services that need them.
3. Create the MQTT user and password
Use the Mosquitto image to create the password file:
docker run --rm -it \
  -v /srv/mosquitto/config:/mosquitto/config \
  eclipse-mosquitto:2 \
  mosquitto_passwd -c /mosquitto/config/passwd viewu
Enter a strong password when prompted.
This creates:
/srv/mosquitto/config/passwd
Mosquitto will use this file to authenticate clients connecting over both MQTT and WebSockets.
If you need another MQTT user later:
docker run --rm -it \
  -v /srv/mosquitto/config:/mosquitto/config \
  eclipse-mosquitto:2 \
  mosquitto_passwd /mosquitto/config/passwd another-user
4. Create the .env file
Move into the Compose directory:
cd ~/frigate-stack
nano .env
Add:
MQTT_USER=viewu
MQTT_PASSWORD=CHANGE_ME
CLOUDFLARE_TUNNEL_TOKEN=CHANGE_ME
MQTT_PASSWORD should match the password you created with mosquitto_passwd.
We will add the Cloudflare Tunnel token shortly.
Lock down the file:
chmod 600 .env
5. Create the Docker Compose stack
Create:
nano compose.yml
Add:
services:

  mosquitto:
    image: eclipse-mosquitto:2
    container_name: mosquitto
    restart: unless-stopped

    command: /usr/sbin/mosquitto -c /mosquitto/config/mosquitto.conf

    volumes:
      - /srv/mosquitto/config:/mosquitto/config
      - /srv/mosquitto/data:/mosquitto/data
      - /srv/mosquitto/log:/mosquitto/log

    networks:
      - frigate-net


  frigate:
    image: ghcr.io/blakeblackshear/frigate:stable
    container_name: frigate
    restart: unless-stopped

    privileged: true
    stop_grace_period: 30s
    shm_size: "256mb"

    ports:
      - "127.0.0.1:15000:5000"

    volumes:
      - /srv/frigate/config:/config
      - /srv/frigate/media:/media/frigate

    tmpfs:
      - /tmp/cache:size=1000000000

    depends_on:
      - mosquitto

    networks:
      - frigate-net


  viewu:
    image: mjeoffline/viewu:amd64_3.5
    container_name: viewu
    restart: unless-stopped

    environment:
      MQTT_IP: "mosquitto"
      MQTT_PORT: "1883"
      MQTT_USER: "${MQTT_USER}"
      MQTT_PASSWORD: "${MQTT_PASSWORD}"

    depends_on:
      - mosquitto

    networks:
      - frigate-net


  cloudflared:
    image: cloudflare/cloudflared:latest
    container_name: cloudflared
    restart: unless-stopped

    command: tunnel --no-autoupdate run --token ${CLOUDFLARE_TUNNEL_TOKEN}

    depends_on:
      - frigate

    networks:
      - frigate-net


networks:
  frigate-net:
    driver: bridge
A few important configuration choices
Both MQTT protocols stay available.
Mosquitto listens internally on:
1883 - MQTT
9001 - MQTT over WebSockets
There is no ports: section on the Mosquitto container because Docker containers on frigate-net can reach both listeners directly.
If you later have a client outside Docker that genuinely needs direct WebSocket access, you can publish 9001 separately. For this stack, there is no reason to expose Mosquitto directly to the internet.
ViewU uses standard MQTT on port 1883.
The container connects to:
mosquitto:1883
The WebSocket listener on 9001 remains available for the parts of the setup that require MQTT over WebSockets.
Frigate only listens locally on the Docker host.
ports:
  - "127.0.0.1:15000:5000"
That gives us a local troubleshooting endpoint at:
http://127.0.0.1:15000
without exposing Frigate across the LAN.
Cloudflare talks directly to Frigate.
Because cloudflared is on the same Docker network, it can reach:
http://frigate:5000
There is no need for Cloudflare to go through the host's 15000 port.
Secrets live in .env.
The MQTT credentials and Cloudflare Tunnel token are not hardcoded into compose.yml.
Using port 15000 instead of 5000 is not a security feature by itself. Binding the service to 127.0.0.1 and avoiding unnecessary exposed services is what matters.
6. Configure MQTT in Frigate
Frigate also needs to know about the MQTT broker.
In your Frigate configuration, add:
mqtt:
  host: mosquitto
  port: 1883
  user: viewu
  password: YOUR_MQTT_PASSWORD
Docker's internal DNS resolves mosquitto to the Mosquitto container.
Use the same username and password created earlier.
Frigate will publish its events over MQTT on port 1883, while Mosquitto also keeps the 9001 WebSocket listener available.
Your camera, detector, recording, snapshot, and object detection settings can then be configured normally in Frigate.
7. Create the Cloudflare Tunnel
Now we need a secure way to reach Frigate when we are away from home.
Open the Cloudflare Zero Trust dashboard and create a new Cloudflare Tunnel.
The flow is roughly:
Networks → Tunnels → Create Tunnel → Cloudflared
Give the tunnel a simple name such as:
frigate
Choose Docker as the environment.
Cloudflare will generate a command containing a long tunnel token.
Copy the token into:
nano ~/frigate-stack/.env
Update:
CLOUDFLARE_TUNNEL_TOKEN=your-long-cloudflare-token
Treat this token like a password. Anyone with it could potentially run another connector for your tunnel.
8. Add a hostname for Frigate
In the Cloudflare Tunnel configuration, create a public hostname such as:
frigate.example.com
Point it to:
http://frigate:5000
This works because cloudflared and Frigate share the same Docker network.
Traffic now looks like this:
Phone / Laptop
      │
      ▼
   Internet
      │
      ▼
  Cloudflare
      │
      ▼
Cloudflare Tunnel
      │
      ▼
frigate:5000
There is no need to open 15000, 5000, 1883, or 9001 on your router.
9. Add Cloudflare Access
The tunnel gets traffic back to Frigate, but I also want an authentication layer before anyone reaches the Frigate UI.
Create a Cloudflare Access application for:
frigate.example.com
Keep the policy simple at a high level:
- Allow only approved users or email addresses.
- Require authentication.
- Enable MFA where available.
- Deny everyone else.
How you configure the identity provider and exact policies is up to you.
The important distinction is:
Cloudflare Tunnel provides the connection back home. Cloudflare Access controls who is allowed through it.
10. Start everything
Back in the Compose directory:
cd ~/frigate-stack
Validate the Compose file:
docker compose config
Pull the images:
docker compose pull
Start the stack:
docker compose up -d
Check the containers:
docker compose ps
You should see:
frigate
mosquitto
viewu
cloudflared
11. Check the logs
If something is not working, start with the container logs.
Mosquitto:
docker compose logs --tail=100 mosquitto
Frigate:
docker compose logs --tail=100 frigate
ViewU:
docker compose logs --tail=100 viewu
Cloudflare:
docker compose logs --tail=100 cloudflared
Or follow everything together:
docker compose logs -f
For Mosquitto, you should see both listeners starting successfully:
1883 - MQTT
9001 - WebSockets
If the WebSocket listener fails, fix that before moving on.
12. Set up ViewU notifications
ViewU connects to the same Mosquitto broker as Frigate:
Frigate
   │
   │ MQTT events
   ▼
Mosquitto
   │
   ├── 1883 MQTT
   │
   └── 9001 WebSockets
   │
   ▼
 ViewU
   │
   ▼
Phone notifications
The Docker environment points ViewU at:
mosquitto:1883
with the MQTT username and password coming from .env.
Mosquitto also keeps its WebSocket listener available at:
mosquitto:9001
Once Frigate starts publishing detection events, ViewU can use those events for mobile notifications.
Finish the app-side ViewU configuration and trigger a test event to make sure notifications are arriving.
13. Test remote access
First, make sure Frigate works locally on the server:
http://127.0.0.1:15000
Then test the Cloudflare hostname:
https://frigate.example.com
For a proper test, turn Wi-Fi off on your phone and use mobile data.
You should hit Cloudflare Access first.
After authentication, you should be able to open Frigate and access:
- Live camera feeds
- Detection events
- Recordings
- Clips
- Snapshots and other media
Then trigger a detection event and confirm that the ViewU notification arrives on your phone.
Final setup
The finished setup looks roughly like this:
                         Internet
                            │
                    Cloudflare Access
                            │
                    Cloudflare Tunnel
                            │
                            ▼
                         Frigate
                  Live / Events / Media
                            │
                     Docker Network
                            │
                  ┌─────────┴─────────┐
                  │                   │
                  ▼                   ▼
              Mosquitto              ViewU
             1883 MQTT                │
          9001 WebSockets             │
                  ▲                   ▼
                  └──── Frigate ──► Phone
                        events     notifications
Frigate and the recordings stay on your own server. Mosquitto provides both normal MQTT on 1883 and MQTT over WebSockets on 9001. ViewU handles the mobile notification side, and Cloudflare gives you a secure route back to Frigate when you are away from home.
The part I like about this setup is that there is no direct internet exposure and no router port forwarding.
You still get live remote access, recordings and event history, MQTT and WebSocket support, plus notifications on your phone without turning Frigate or Mosquitto into publicly exposed services.
Comments (0)
No comments yet.